中后台系统之mbs-cli脚手架集成

一般,我们知道

为什么需要脚手架?

  1. 减少重复性的工作,不再需要复制其他项目再删除无关代码,或者从零创建一个项目和文件。
  2. 根据交互动态生成项目结构和配置文件,具备更高的灵活性和人性化定制的能力。
  3. 多人协作更为方便,避免了人工传递文件的繁琐。
  4. 集成互联网上的模板,方便自己与他人使用。

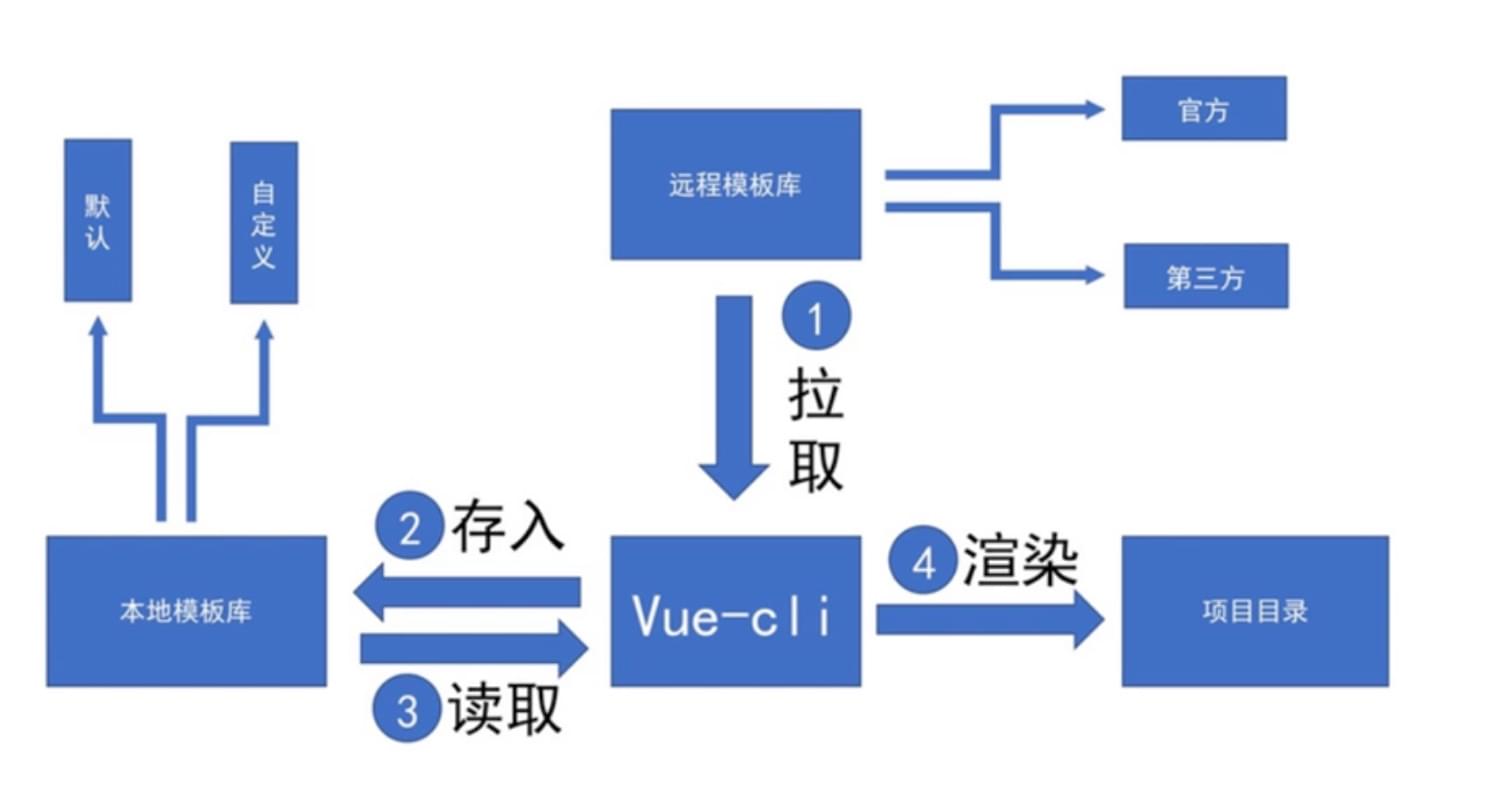
脚手架工作流

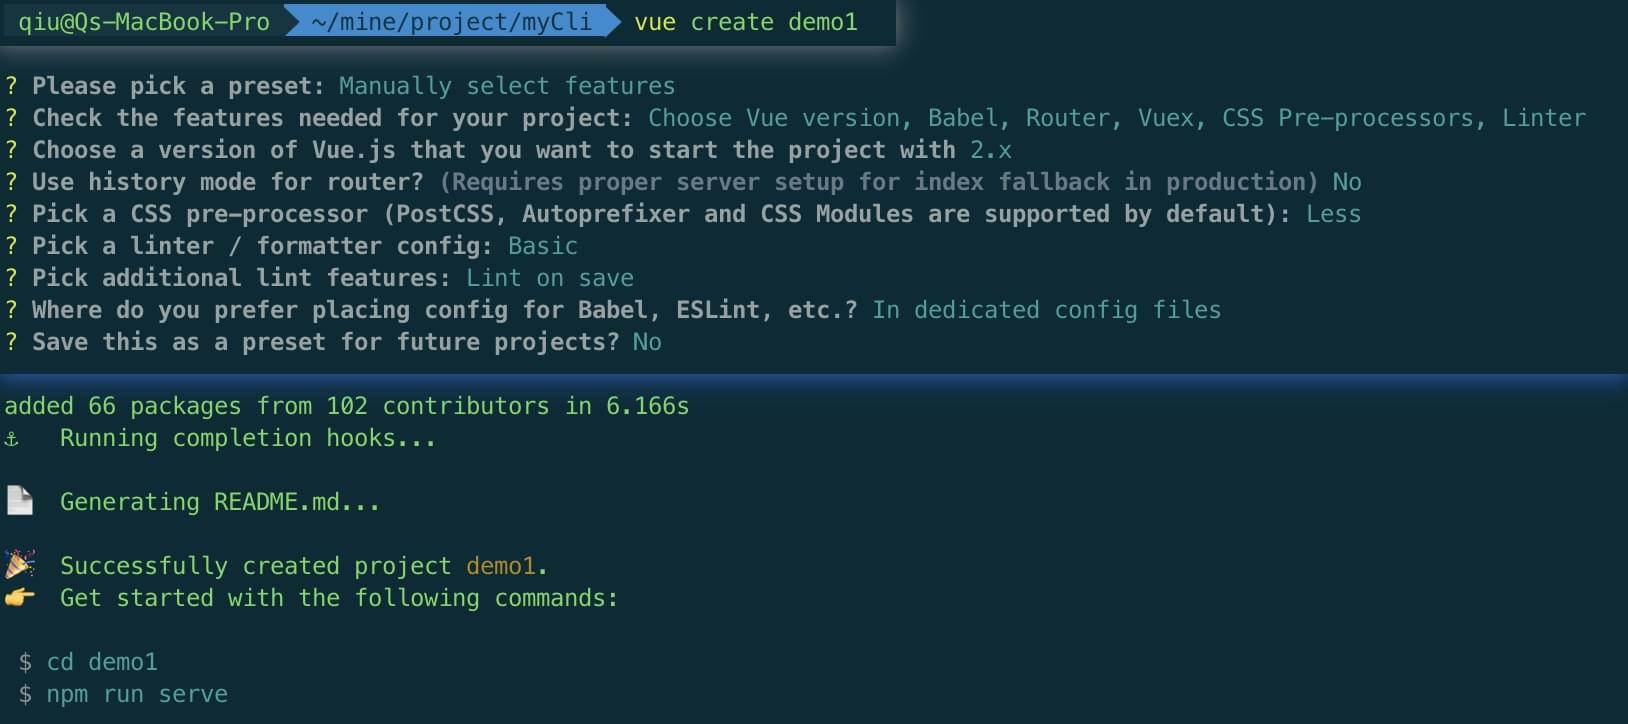
脚手架问答流

如何搭建一个脚手架
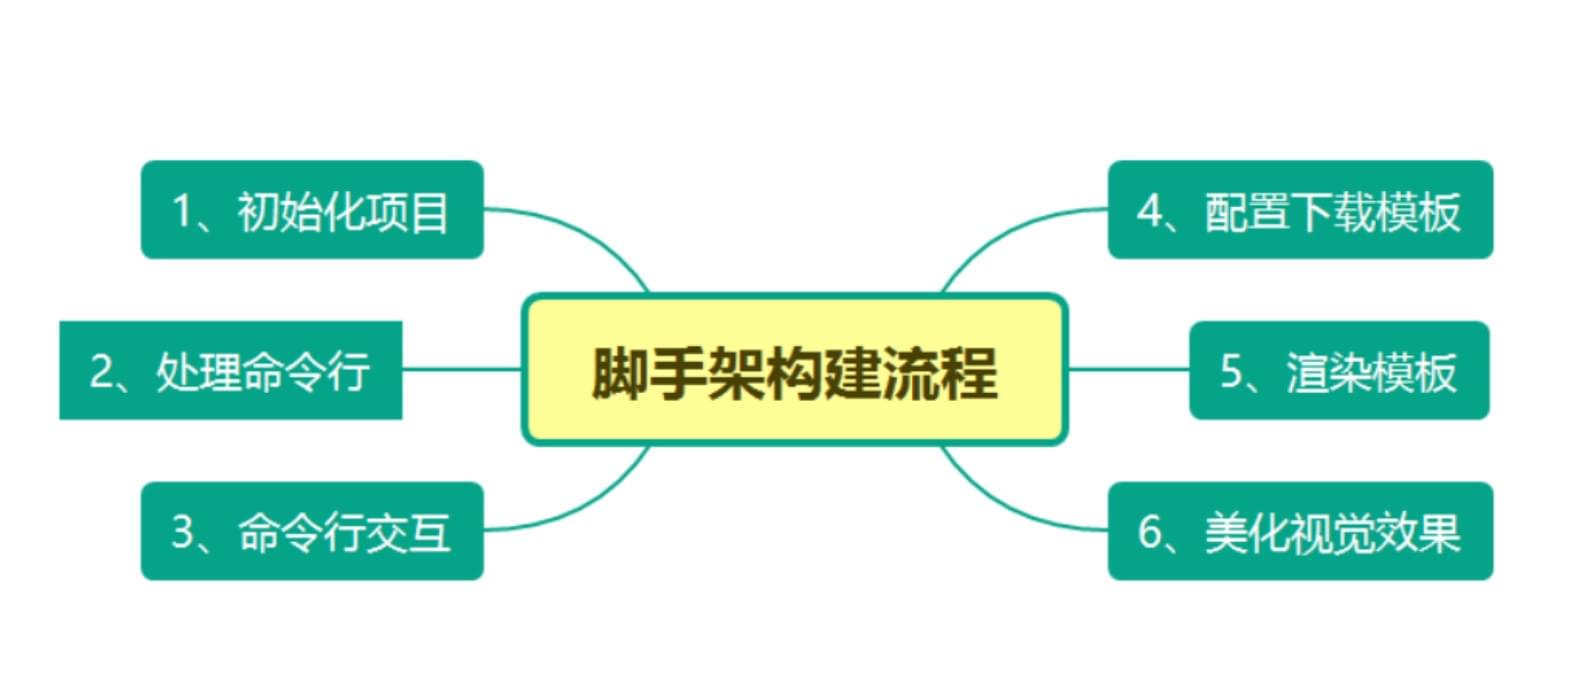
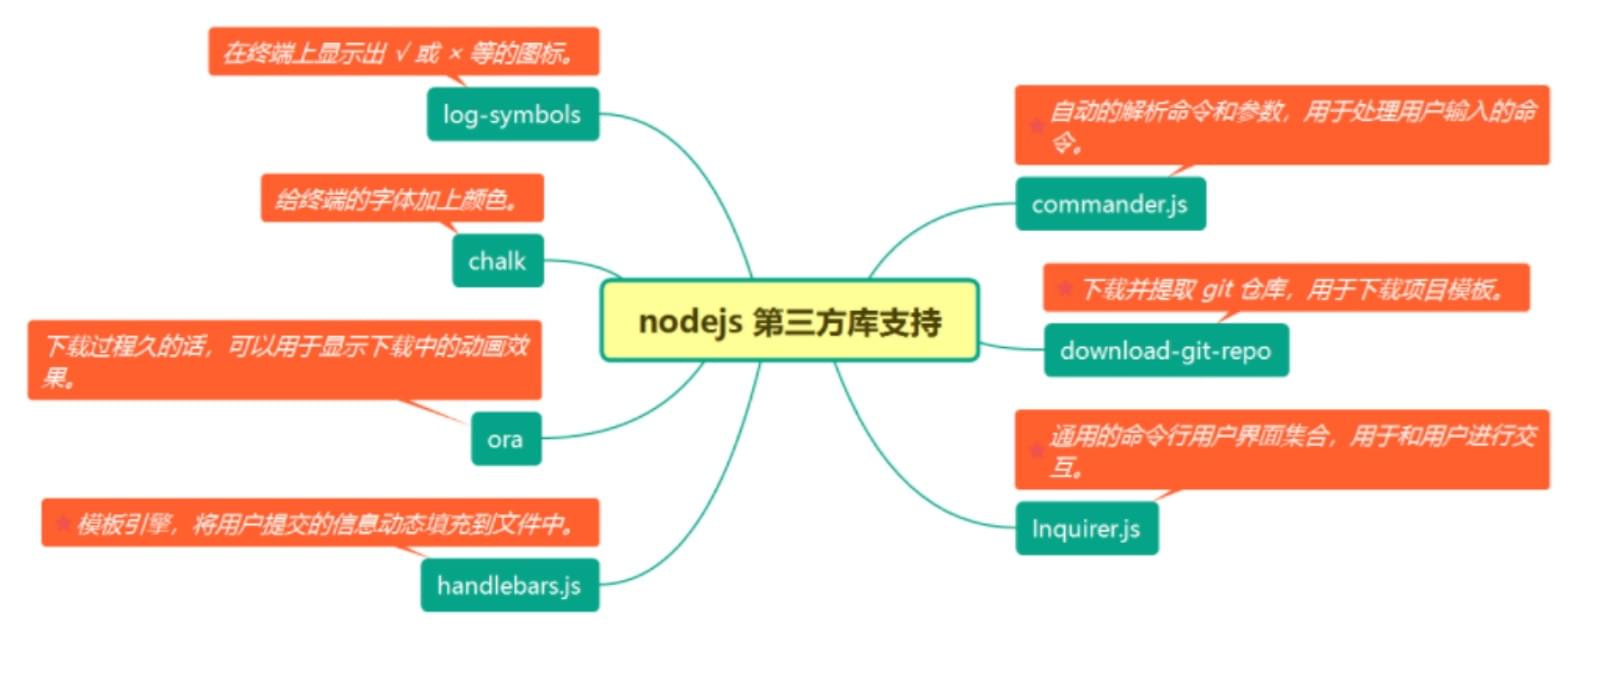
第三方库的支持
搭建步骤

1、初始化项目

首先创建一个空项目,命名为 mbs-cli ,然后新建一个 bin/mbs 文件,再执行 npm init 生成一个 package.json 文件。最后安装上面需要用到的依赖。

1
2
3
mkdir mbs-cli && cd mbs-cli
mkdir bin && cd bin && touch mbs && cd ../ && npm init
npm install commander download-git-repo inquirer handlebars ora chalk log-symbols cli-table -S
2、处理命令行

node.js 内置了对命令行操作的支持,在 package.json 中的 bin 字段可以定义命令名和关联的执行文件。

package.json 中加上 bin 的内容:

1
2
3
4
5
6
7
8
{
"name": "mbs-cli",
"version": "1.0.0",
"description": "中后台系统脚手架",
"bin": {
"mbs": "bin/mbs"
}
}

首先在 mbs 文件中引入相关依赖模块:

1
2
3
4
5
6
7
8
9
#!/usr/bin/env node

const { existsSync } = require('fs') // 系统内置模块 主要用来操作文件
const program = require('commander') // 自动的解析命令和参数,用于处理用户输入的命令
const chalk = require('chalk') // 给终端的字体加上颜色
const symbols = require('log-symbols') // 在终端上显示出 ✔︎ 或者 ✘ 等的图标

const { resolve } = require('path')
const res = command => resolve(__dirname, '../commands/', command)

然后编写nodejs处理逻辑,具体用法见下。

nodejs依赖模块介绍与用法

commander(指挥官)

自动地解析命令和参数,用于处理用户输入的命令

  • usage(): 设置usage值,自定义帮助信息
  • command(): 定义一个命令名字
  • description(): 设置 description值
  • option(): 定义参数,需要设置「关键字」和 「描述」,关键字包括「简写」和「全写」两部分,以 ,|空格 做分隔
  • parse(): 解析命令行参数 argv
  • version(): 终端输出版本号

定义常规命令:

1
2
3
// 定义常规命令
program.usage('<command>')
program.version(require('../package').version)

init命令逻辑

1
2
3
4
5
6
7
8
9
10
11
12
13
14
// init 命令逻辑
program
.command('init <name>')
.description('Generate a new project')
.alias('i')
.action((name) => {
if (!existsSync(name)) {
console.log(name)
require(res('init'))
} else {
// 错误提示项目已存在,避免覆盖原有项目
console.log(symbols.error, chalk.red('Project already exists'))
}
})

处理用户输入命令

1
2
3
4
5
6
7
8
9
10
11
12
13
14
// init 命令逻辑
program
.command('init <name>')
.description('Generate a new project')
.alias('i')
.action((name) => {
if (!existsSync(name)) {
console.log(name)
require(res('init'))
} else {
// 错误提示项目已存在,避免覆盖原有项目
console.log(symbols.error, chalk.red('Project already exists'))
}
})

最后处理解析命令行参数

1
2
3
4
5
6
7
8
program.parse(process.argv)
// program.parse: 解析命令之中的参数,根据上面定义好的规则执行命令
// process: 一个全局对象,控制有关信息,控制node.js的进程
// process.argv: 该属性返回一个数组,这个数组包含了启动node.js进程时的命令行参数

if (!program.args.length) {
program.help()
}
inquirer(询问者)

通用的命令行用户界面集合,用于和用户进行交互。由于交互的问题种类不同,inquirer 为每个问题提供很多参数

1
2
3
4
5
6
7
8
9
10
type: 表示提问的类型,包括:input, confirm, list, rawlist, expand, checkbox, password, editor;
name: 存储当前问题回答的变量;
message: 问题的描述;
default: 默认值;
choices: 列表选项,在某些type下可用,并且包含一个分隔符(separator);
validate: 对用户的回答进行校验‘
filter: 对用户的回答进行过滤处理,返回处理后的值;
when: 根据前面问题的回答,判断当前问题是否需要被回答;
prefix: 修改message默认前缀;
suffix: 修改message默认后缀;

语法结构

1
2
3
4
5
6
7
8
9
const inquirer = require('inquirer')

const promptList = [
// 具体交互内容
]

inquirer.prompt(promptList).then(answers => {
console.log(answers) // 返回的结果
})

input类型

1
2
3
4
5
6
7
const promptList1 = [
{
type: 'input',
name: 'author',
message: '请输入作者名称'
}
]

效果

confirm类型

1
2
3
4
5
6
7
8
9
10
11
12
13
14
15
16
17
const promptList2 = [
{
type: 'confirm',
name: 'watch',
message: '是否使用监听?',
prefix: '前缀'
},
{
type: 'confirm',
name: 'filter',
message: '是否使用过滤?',
when: function (answers) { // 当watch为ture时才会提示当前问题
return answers.watch
},
suffix: '后缀'
}
]

效果

list类型

1
2
3
4
5
6
7
8
9
10
11
12
13
14
15
const promptList3 = [
{
type: 'list',
message: '请选择一种水果:',
name: 'fruit',
choices: [
'Apple',
'Pear',
'Banana'
],
filter: function (val) { // 使用 filter 将回答变为小写
return val.toLowerCase()
}
}
]

效果

download-git-repo

download-git-repo 支持从 GithubGitlabBitbucket 下载仓库

1
download(repository, destination, options, callback)

repository

1
2
3
4
- GitHub - github:owner/name or simply owner/name
- GitLab - gitlab:owner/name
- Bitbucket - bithucket:owner/name
- Direct - direct:url:branch

destination

1
The file path to download the repository to. xxxxxxxxx

options

1
2
3
boolean default false - if true use git clone instead of an http download. 
while this can be a bit slower, it does allow private repositories to be used
if the appropriate SSH keys are setup.

callback

1
The callback function as function (err).
ora(loading动效)

用于显示下载中的动画效果

1
2
3
4
5
6
7
8
9
const ora = require('ora')
const spinner = ora('正在下载模板...')

// 开始下载
spinner.start()
// 下载成功
spinner.succeed('模板下载成功!')
// 下载失败
spinner.faild('模板下载失败!')

chalk(字体颜色)

通过 chalk 来为打印信息加上样式,比如成功信息为绿色,失败信息为红色。这样子会让用户更加容易辨认,同时也让终端的显示更加好看:

1
2
3
const chalk = require('chalk')
console.log(chalk.green('项目创建成功'))
console.log(chalk.red('项目创建失败'))
log-symbols(日志符号)

使用 log-symbols 在信息前面加上 ✔︎ 或者 ✘ 等的图标,优化视觉体验:

1
console.log(symbols.success, chalk.green('New project has been initialize successfully!'))

handlebars

handlebars 可以对仓库的模板中的 package.json 文件做一些动态修改:

1
2
3
4
5
6
7
8
9
10
11
12
13
14
15
{
"name": "{{name}}",
"version": "1.0.0",
"description": "{{description}}",
"bin": {
"mbs": "bin/mbs"
},
"main": "index.js",
"scripts": {
"test": "echo \"Error: no test specified\" && exit 1"
},
"author": "{{author}}",
"license": "ISC",
...
}

并在下载模板完成之后将用户输入的答案渲染到 package.json

1
2
3
4
5
6
7
8
9
10
11
12
13
14
15
16
17
18
19
20
21
const { readFileSync, writeFileSync }  = require('fs')
const handlebars = require('handlebars')

function reWrite (name, answers) {
const filename = './package.json'
const meta = {
name,
description: answers.description,
author: answers.author
}
const content = readFileSync(filename).toString()
const result = handlebars.compile(content)(meta)
writeFileSync(filename, result)

// 或者添加其他依赖包
const content = readFileSync(filename, 'utf-8')
const obj = JSON.parse(content)
obj.dependencies['echart'] = '^0.1.3'
const result = handlebars.compile(JSON.stringify(obj, null, 2))(meta)
writeFileSync(filename, result)
}
cli-table

表格

1
2
3
4
5
6
7
8
9
10
11
12
13
14
15
16
const Table = require('cli-table')
const template = require(`${__dirname}/../templates.json`)


const table = new Table({
head: ['Template Name', 'Branch', 'Url '],
style: {
head: ['green']
}
})

// 添加数据
table.push(['template1', 'branch1', 'url1'])

// 显示数据
console.log(table.toString())

shelljs

执行命令行命令 cd path && npm i

1
2
3
4
5
6
7
8
9
10
11
12
13
14
15
var shell = require('shelljs')

shell.cd(meta.name)
shell.exec('npm i', function (err, stdout, stderr) {
if (err) {
spinner.fail()
console.log(symbols.error, chalk.red(err))
} else {
spinner.succeed()
console.log(
symbols.success,
chalk.green('The object has installed dependence successfully!')
)
}
})

msb-cli脚手架

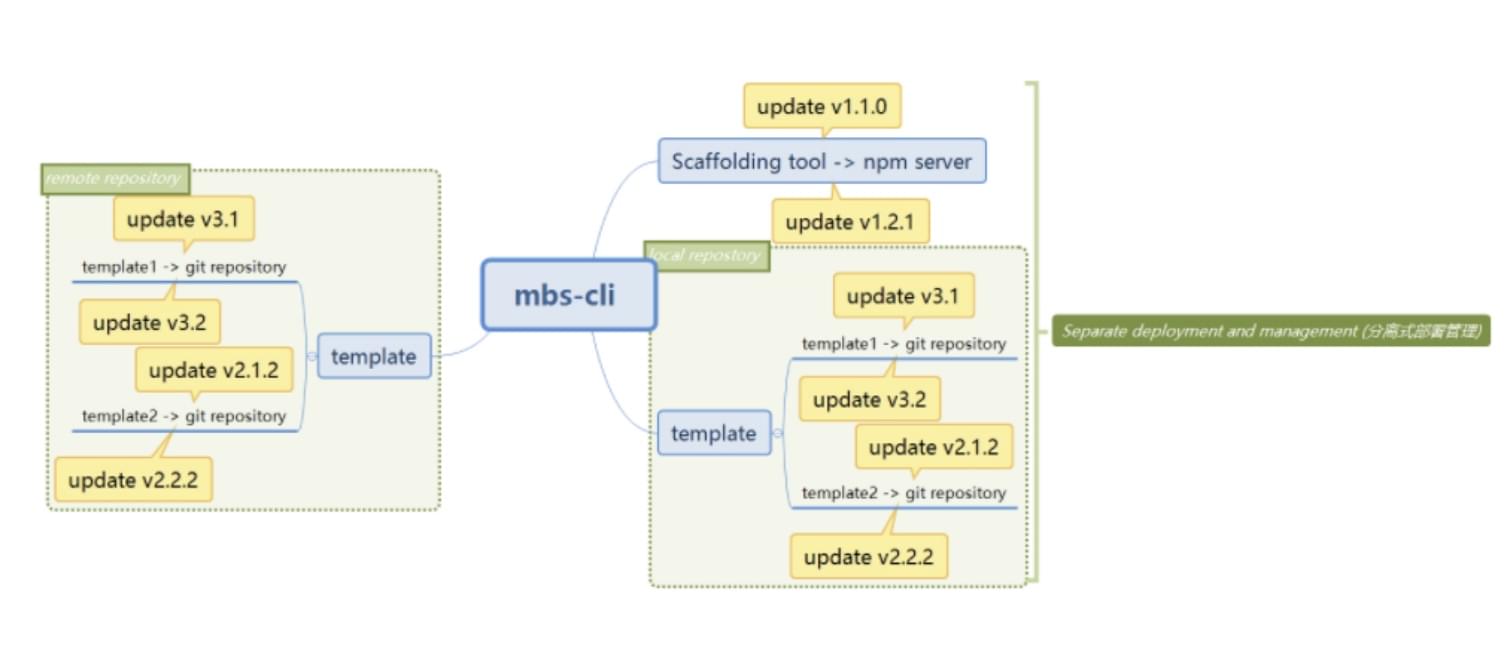
mbs-cli工作流

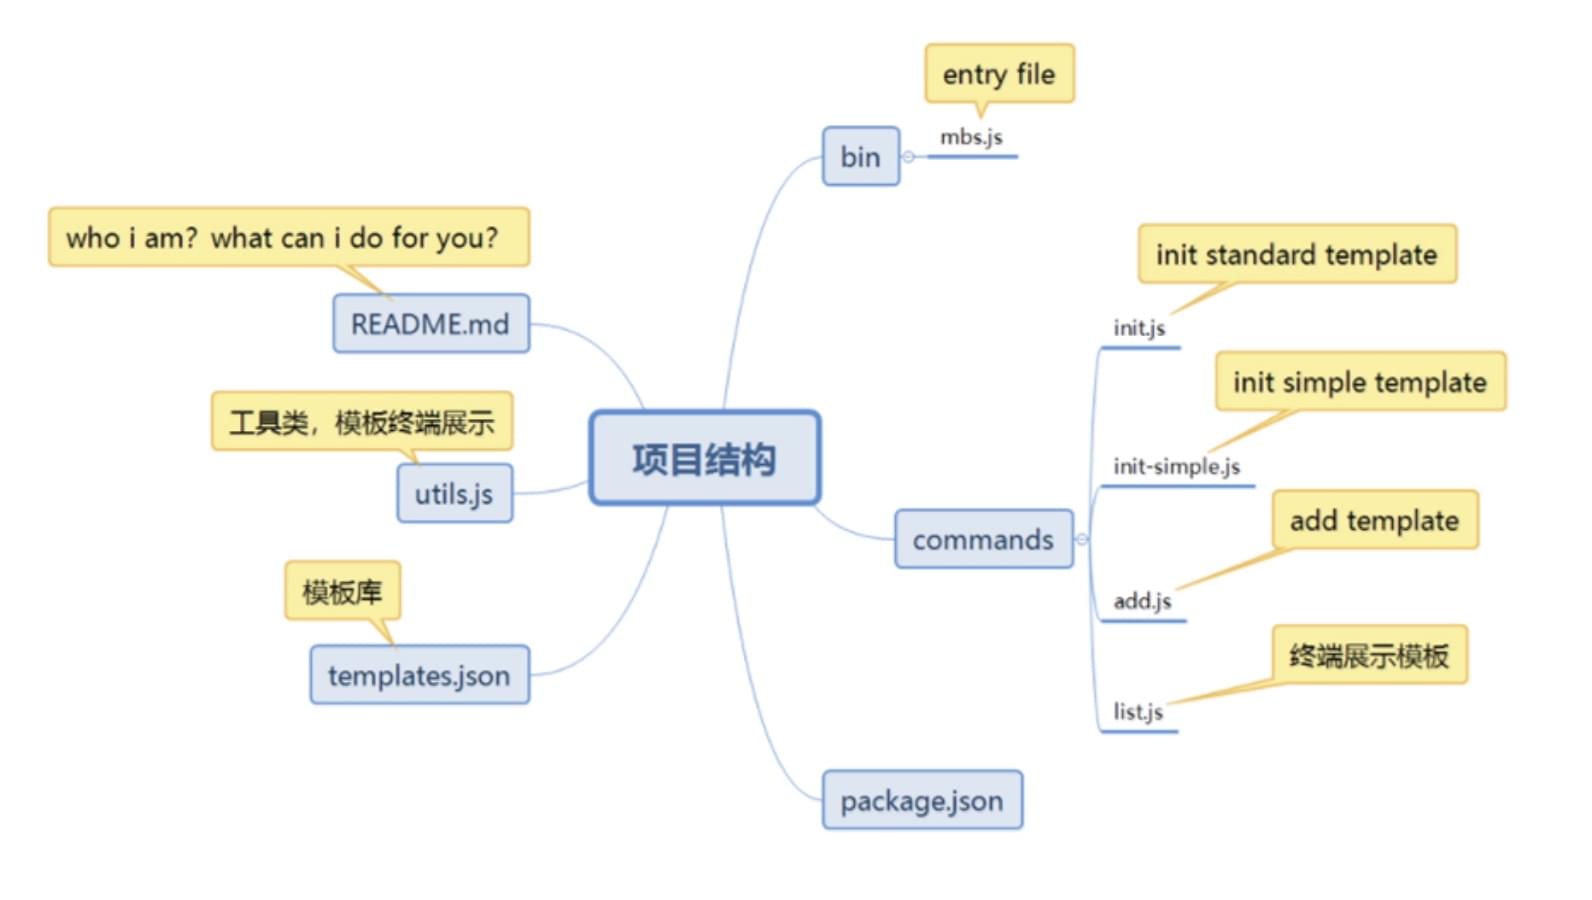
mbs-cli目录结构

mbs-cli核心命令
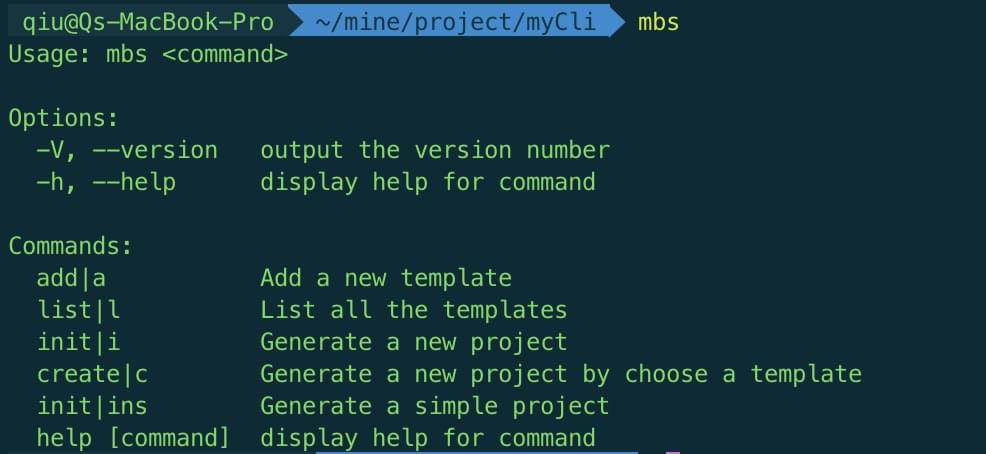
本地npm模块调试

开启调试模式

npm link 可以将当前目录 ./bin 文件夹下的 npm包 链接到全局执行环境,从而在任意位置使用命令行都可以直接运行该 npm包

关闭调试模式

在当前目录下执行 npm unlink 即可删除链接符号

分享到:
11